Introduction to Bazel: Building an Android App
In this tutorial, you will learn how to build a simple Android app using Bazel.
Bazel supports building Android apps using the Android rules.
This tutorial is intended for Windows, macOS and Linux users and does not require experience with Bazel or Android app development. You do not need to write any Android code in this tutorial.
Prerequisites
You will need to install the following software:
- Bazel. To install, follow the installation instructions.
- Android Studio. To install, follow the steps to download Android Studio.
- (Optional) Git. We will use
gitto download the Android app project.
Getting started
We will be using a basic Android app project in Bazel’s examples repository.
This app has a single button that prints a greeting when clicked.
Clone the repository with git (or download the ZIP file
directly):
git clone git@github.com:bazelbuild/examples.git bazel-examples
cd bazel-examples/android/tutorial
For the rest of the tutorial, you will be executing commands in this directory.
Review the source files
Let’s take a look at the source files for the app.
.
├── README.html
└── src
    └── main
        ├── AndroidManifest.xml
        └── java
            └── com
                └── example
                    └── bazel
                        ├── AndroidManifest.xml
                        ├── Greeter.java
                        ├── MainActivity.java
                        └── res
                            ├── layout
                            │   └── activity_main.xml
                            └── values
                                ├── colors.xml
                                └── strings.xml
The key files and directories are:
| Name | Location |
| Android manifest files | src/main/AndroidManifest.xml and src/main/java/com/example/bazel/AndroidManifest.xml |
| Android source files | src/main/java/com/example/bazel/MainActivity.java and Greeter.java |
| Resource file directory | src/main/java/com/example/bazel/res/ |
Initialize the project’s workspace
A workspace is a directory that contains the
source files for one or more software projects, and has a WORKSPACE file at
its root.
The WORKSPACE file may be empty or may contain references to external
dependencies required to build your project.
First, run the following command to create an empty WORKSPACE file:
| Linux, macOS | touch WORKSPACE |
| Windows (Command Prompt) | type nul > WORKSPACE |
| Windows (PowerShell) | New-Item WORKSPACE -ItemType file |
Running Bazel
You can now check if Bazel is running correctly with the command:
bazel info workspace
If Bazel prints the path of the current directory, you’re good to go! If the
WORKSPACE file does not exist, you may see an error message like:
ERROR: The 'info' command is only supported from within a workspace.
Integrate with the Android SDK
Bazel needs to run the Android SDK build
tools to build
the app. This means that you need to add some information to your WORKSPACE
file so that Bazel knows where to find them.
Add the following line to your WORKSPACE file:
android_sdk_repository(name = "androidsdk")
This will use the Android SDK at the path referenced by the ANDROID_HOME
environment variable, and automatically detect the highest API level and the
latest version of build tools installed within that location.
You can set the ANDROID_HOME variable to the location of the Android SDK. Find
the path to the installed SDK using Android Studio’s SDK
Manager.
For example, as the default SDK path is in your home directory for Linux and
macOS, and LOCALAPPDATA for Windows, you can use the following commands to set
the ANDROID_HOME variable:
| Linux, macOS | export ANDROID_HOME=$HOME/Android/Sdk/ |
| Windows (Command Prompt) | set ANDROID_HOME=%LOCALAPPDATA%\Android\Sdk |
| Windows (PowerShell) | $env:ANDROID_HOME="$env:LOCALAPPDATA\Android\Sdk" |
The above commands set the variable only for the current shell session. To make them permanent, run the following commands:
| Linux, macOS | echo "export ANDROID_HOME=$HOME/Android/Sdk/" >> ~/.bashrc |
| Windows (Command Prompt) | setx ANDROID_HOME "%LOCALAPPDATA%\Android\Sdk" |
| Windows (PowerShell) | [System.Environment]::SetEnvironmentVariable('ANDROID_HOME', "$env:LOCALAPPDATA\Android\Sdk", [System.EnvironmentVariableTarget]::User) |
You can also explicitly specify the absolute path of the Android SDK,
the API level, and the version of build tools to use by including the path,
api_level, and build_tools_version attributes. If api_level and
build_tools_version are not specified, the android_sdk_repository rule will
use the respective latest version available in the SDK. You can specify any
combination of these attributes, as long as they are present in the SDK, for
example:
android_sdk_repository(
    name = "androidsdk",
    path = "/path/to/Android/sdk",
    api_level = 25,
    build_tools_version = "26.0.1"
)
On Windows, note that the path attribute must use the mixed-style path, that
is, a Windows path with forward slashes:
android_sdk_repository(
    name = "androidsdk",
    path = "c:/path/to/Android/sdk",
)
Optional: If you want to compile native code into your Android app, you
also need to download the Android
NDK
and tell Bazel where to find it by adding the following line to your WORKSPACE file:
android_ndk_repository(name = "androidndk")
Similar to android_sdk_repository, the path to the Android NDK is inferred
from the ANDROID_NDK_HOME environment variable by default. The path can also
be explicitly specified with a path attribute on android_ndk_repository.
For more information, read Using the Android Native Development Kit with Bazel.
api_level is the version of the Android API that the SDK and NDK
target - for example, 23 for Android 6.0 and 25 for Android 7.1. If not
explicitly set, api_level defaults to the highest available API level for
android_sdk_repository and android_ndk_repository.
It’s not necessary to set the API levels to the same value for the SDK and NDK. This page contains a map from Android releases to NDK-supported API levels.
Create a BUILD file
A BUILD file describes the relationship
between a set of build outputs, like compiled Android resources from aapt or
class files from javac, and their dependencies. These dependencies may be
source files (Java, C++) in your workspace or other build outputs. BUILD files
are written in a language called Starlark.
BUILD files are part of a concept in Bazel known as the package hierarchy.
The package hierarchy is a logical structure that overlays the directory
structure in your workspace. Each package is a
directory (and its subdirectories) that contains a related set of source files
and a BUILD file. The package also includes any subdirectories, excluding
those that contain their own BUILD file. The package name is the path to the
BUILD file relative to the WORKSPACE.
Note that Bazel’s package hierarchy is conceptually different from the Java
package hierarchy of your Android App directory where the BUILD file is
located. , although the directories may be organized identically.
For the simple Android app in this tutorial, the source files in src/main/
comprise a single Bazel package. A more complex project may have many nested
packages.
Add an android_library rule
A BUILD file contains several different types of declarations for Bazel. The
most important type is the build rule, which tells
Bazel how to build an intermediate or final software output from a set of source
files or other dependencies.
Bazel provides two build rules, android_library and android_binary, that you
can use to build an Android app. For this tutorial, you’ll first use the
android_library rule to tell Bazel to
build an Android library
module
from the app source code and resource files. You’ll then use the
android_binary rule to tell Bazel how to build the Android application package.
Create a new BUILD file in the src/main/java/com/example/bazel directory,
and declare a new android_library target:
src/main/java/com/example/bazel/BUILD:
package(
    default_visibility = ["//src:__subpackages__"],
)

android_library(
    name = "greeter_activity",
    srcs = [
        "Greeter.java",
        "MainActivity.java",
    ],
    manifest = "AndroidManifest.xml",
    resource_files = glob(["res/**"]),
)
The android_library build rule contains a set of attributes that specify the
information that Bazel needs to build a library module from the source files.
Note also that the name of the rule is greeter_activity. You’ll reference the
rule using this name as a dependency in the android_binary rule.
Add an android_binary rule
The android_binary rule builds
the Android application package (.apk file) for your app.
Create a new BUILD file in the src/main/ directory,
and declare a new android_binary target:
src/main/BUILD:
android_binary(
    name = "app",
    manifest = "AndroidManifest.xml",
    deps = ["//src/main/java/com/example/bazel:greeter_activity"],
)
Here, the deps attribute references the output of the greeter_activity rule
you added to the BUILD file above. This means that when Bazel builds the
output of this rule it checks first to see if the output of the
greeter_activity library rule has been built and is up-to-date. If not, Bazel
builds it and then uses that output to build the application package file.
Now, save and close the file.
Build the app
Let’s try building the app! Run the following command to build the
android_binary target:
bazel build //src/main:app
The build subcommand instructs Bazel to build the
target that follows. The target is specified as the name of a build rule inside
a BUILD file, with along with the package path relative to your workspace
directory. For this example, the target is app and the package path is
//src/main/.
Note that you can sometimes omit the package path or target name, depending on your current working directory at the command line and the name of the target. See Labels in the Bazel Concepts and Terminology page for more information about target labels and paths.
Bazel will start to build the sample app. During the build process, its output will appear similar to the following:
INFO: Analysed target //src/main:app (0 packages loaded, 0 targets configured).
INFO: Found 1 target...
Target //src/main:app up-to-date:
  bazel-bin/src/main/app_deploy.jar
  bazel-bin/src/main/app_unsigned.apk
  bazel-bin/src/main/app.apk
Locate the build outputs
Bazel puts the outputs of both intermediate and final build operations in a set
of per-user, per-workspace output directories. These directories are symlinked
from the following locations at the top-level of the project directory, where
the WORKSPACE is:
bazel-binstores binary executables and other runnable build outputsbazel-genfilesstores intermediary source files that are generated by Bazel rulesbazel-outstores other types of build outputs
Bazel stores the Android .apk file generated using the android_binary rule
in the bazel-bin/src/main directory, where the subdirectory name src/main is
derived from the name of the Bazel package.
At a command prompt, list the contents of this directory and find the app.apk
file:
| Linux, macOS | ls bazel-bin/src/main |
| Windows (Command Prompt) | dir bazel-bin\src\main |
| Windows (PowerShell) | ls bazel-bin\src\main |
Run the app
You can now deploy the app to a connected Android device or emulator from the
command line using the bazel
mobile-install command. This command uses
the Android Debug Bridge (adb) to communicate with the device. You must set up
your device to use adb following the instructions in Android Debug
Bridge before deployment. You
can also choose to install the app on the Android emulator included in Android
Studio. Make sure the emulator is running before executing the command below.
Enter the following:
bazel mobile-install //src/main:app
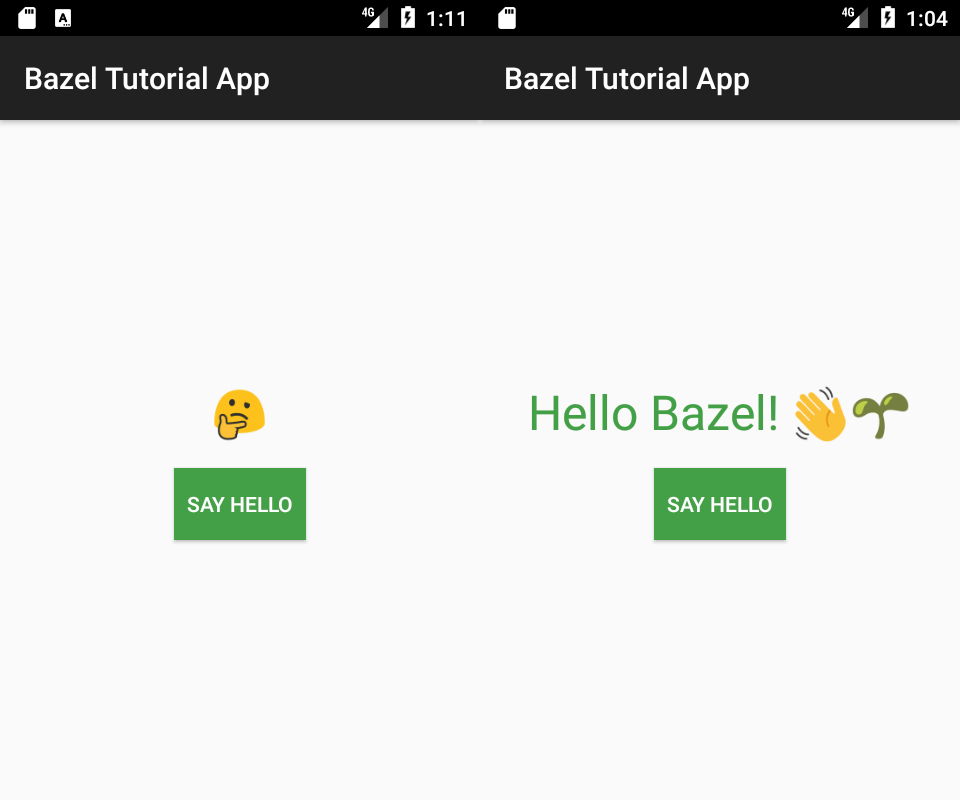
Next, find and launch the “Bazel Tutorial App”, which looks as follows:
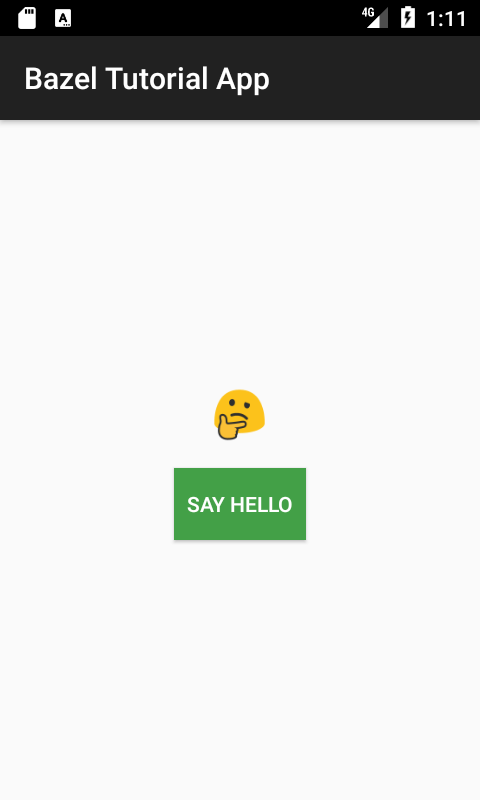
Congratulations! You have just installed your first Bazel-built Android app.
Note that the mobile-install subcommand also supports the
--incremental flag that can be used to
deploy only those parts of the app that have changed since the last deployment.
It also supports the --start_app flag to start the app immediately upon
installing it.
Review your work
In this tutorial, you used Bazel to build an Android app. To accomplish that, you:
- Set up your environment by installing Bazel and Android Studio, and downloading the sample project.
- Set up a Bazel workspace that contains the source code
for the app and a
WORKSPACEfile that identifies the top level of the workspace directory. - Updated the
WORKSPACEfile to contain references to the required external dependencies, like the Android SDK. - Created a
BUILDfile. - Built the app with Bazel.
- Deployed and ran the app on an Android emulator or physical device.
Further reading
You now know the basics of building an Android project with Bazel. Here are some other pages to check out:
- More information on mobile-install
- Integrate external dependencies like AppCompat, Guava and JUnit from Maven repositories using rules_jvm_external
- Run Robolectric tests with the robolectric-bazel integration.
- Testing your app with Android instrumentation tests
- Integrating C and C++ code into your Android app with the NDK
- See more Bazel example projects of:
Happy building!