Introduction to Bazel: Building a C++ Project
In this tutorial, you’ll learn the basics of building C++ applications with
Bazel. You will set up your workspace and build a simple C++ project that
illustrates key Bazel concepts, such as targets and BUILD files. After
completing this tutorial, take a look at
Common C++ Build Use Cases for information on more advanced
concepts such as writing and running C++ tests.
Estimated completion time: 30 minutes.
What you’ll learn
In this tutorial you’ll learn how to:
- Build a target
- Visualize the project’s dependencies
- Split the project into multiple targets and packages
- Control target visibility across packages
- Reference targets through labels
Contents
- What you’ll learn
- Before you begin
- Build with Bazel
- Refine your Bazel build
- Use labels to reference targets
- Further reading
Before you begin
To prepare for the tutorial, first Install Bazel if you don’t have it installed already. Then, retrieve the sample project from Bazel’s GitHub repository:
git clone https://github.com/bazelbuild/examples
The sample project for this tutorial is in the examples/cpp-tutorial directory
and is structured as follows:
examples
└── cpp-tutorial
    ├──stage1
    │  ├── main
    │  │   ├── BUILD
    │  │   └── hello-world.cc
    │  └── WORKSPACE
    ├──stage2
    │  ├── main
    │  │   ├── BUILD
    │  │   ├── hello-world.cc
    │  │   ├── hello-greet.cc
    │  │   └── hello-greet.h
    │  └── WORKSPACE
    └──stage3
       ├── main
       │   ├── BUILD
       │   ├── hello-world.cc
       │   ├── hello-greet.cc
       │   └── hello-greet.h
       ├── lib
       │   ├── BUILD
       │   ├── hello-time.cc
       │   └── hello-time.h
       └── WORKSPACE
As you can see, there are three sets of files, each set representing a stage in this tutorial. In the first stage, you will build a single target residing in a single package. In the second stage, you will split your project into multiple targets but keep it in a single package. In the third and final stage, you will split your project into multiple packages and build it with multiple targets.
Build with Bazel
Set up the workspace
Before you can build a project, you need to set up its workspace. A workspace is a directory that holds your project’s source files and Bazel’s build outputs. It also contains files that Bazel recognizes as special:
-
The
WORKSPACEfile, which identifies the directory and its contents as a Bazel workspace and lives at the root of the project’s directory structure, -
One or more
BUILDfiles, which tell Bazel how to build different parts of the project. (A directory within the workspace that contains aBUILDfile is a package. You will learn about packages later in this tutorial.)
To designate a directory as a Bazel workspace, create an empty file named
WORKSPACE in that directory.
When Bazel builds the project, all inputs and dependencies must be in the same workspace. Files residing in different workspaces are independent of one another unless linked, which is beyond the scope of this tutorial.
Understand the BUILD file
A BUILD file contains several different types of instructions for Bazel.
The most important type is the build rule, which tells Bazel how to build the
desired outputs, such as executable binaries or libraries. Each instance
of a build rule in the BUILD file is called a target and points to a
specific set of source files and dependencies. A target can also point to other
targets.
Take a look at the BUILD file in the cpp-tutorial/stage1/main directory:
cc_binary(
    name = "hello-world",
    srcs = ["hello-world.cc"],
)
In our example, the hello-world target instantiates Bazel’s built-in
cc_binary rule. The rule tells Bazel to build
a self-contained executable binary from the hello-world.cc source file with no
dependencies.
The attributes in the target explicitly state its dependencies and options.
While the name attribute is mandatory, many are optional. For example, in the
hello-world target, name is self-explanatory, and srcs specifies the
source file(s) from which Bazel builds the target.
Build the project
Let’s build your sample project. Change into the cpp-tutorial/stage1 directory
and run the following command:
bazel build //main:hello-world
Notice the target label - the //main: part is the location of our BUILD
file relative to the root of the workspace, and hello-world is what we named
that target in the BUILD file. (You will learn about target labels in more
detail at the end of this tutorial.)
Bazel produces output similar to the following:
INFO: Found 1 target...
Target //main:hello-world up-to-date:
  bazel-bin/main/hello-world
INFO: Elapsed time: 2.267s, Critical Path: 0.25s
Congratulations, you just built your first Bazel target! Bazel places build
outputs in the bazel-bin directory at the root of the workspace. Browse
through its contents to get an idea for Bazel’s output structure.
Now test your freshly built binary:
bazel-bin/main/hello-world
Review the dependency graph
A successful build has all of its dependencies explicitly stated in the BUILD
file. Bazel uses those statements to create the project’s dependency graph,
which enables accurate incremental builds.
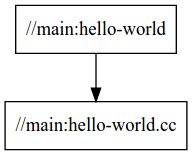
Let’s visualize our sample project’s dependencies. First, generate a text representation of the dependency graph (run the command at the workspace root):
bazel query --notool_deps --noimplicit_deps 'deps(//main:hello-world)' \
  --output graph
The above command tells Bazel to look for all dependencies for the target
//main:hello-world (excluding host and implicit dependencies) and format the
output as a graph.
Then, paste the text into GraphViz.
On Ubuntu, you can view the graph locally by installing GraphViz and the xdot Dot Viewer:
sudo apt update && sudo apt install graphviz xdot
Then you can generate and view the graph by piping the text output above straight to xdot:
xdot <(bazel query --notool_deps --noimplicit_deps 'deps(//main:hello-world)' \
  --output graph)
As you can see, the first stage of the sample project has a single target that builds a single source file with no additional dependencies:
Now that you have set up your workspace, built your project, and examined its dependencies, let’s add some complexity.
Refine your Bazel build
While a single target is sufficient for small projects, you may want to split larger projects into multiple targets and packages to allow for fast incremental builds (that is, only rebuild what’s changed) and to speed up your builds by building multiple parts of a project at once.
Specify multiple build targets
Let’s split our sample project build into two targets. Take a look at the
BUILD file in the cpp-tutorial/stage2/main directory:
cc_library(
    name = "hello-greet",
    srcs = ["hello-greet.cc"],
    hdrs = ["hello-greet.h"],
)

cc_binary(
    name = "hello-world",
    srcs = ["hello-world.cc"],
    deps = [
        ":hello-greet",
    ],
)
With this BUILD file, Bazel first builds the hello-greet library
(using Bazel’s built-in cc_library rule),
then the hello-world binary. The deps attribute in the hello-world target
tells Bazel that the hello-greet library is required to build the hello-world
binary.
Let’s build this new version of our project. Change into the
cpp-tutorial/stage2 directory and run the following command:
bazel build //main:hello-world
Bazel produces output similar to the following:
INFO: Found 1 target...
Target //main:hello-world up-to-date:
  bazel-bin/main/hello-world
INFO: Elapsed time: 2.399s, Critical Path: 0.30s
Now test your freshly built binary:
bazel-bin/main/hello-world
If you now modify hello-greet.cc and rebuild the project, Bazel will
only recompile that file.
Looking at the dependency graph, you can see that hello-world depends on the
same inputs as it did before, but the structure of the build is different:

You’ve now built the project with two targets. The hello-world target builds
one source file and depends on one other target (//main:hello-greet), which
builds two additional source files.
Use multiple packages
Let’s now split the project into multiple packages. Take a look at the contents
of the cpp-tutorial/stage3 directory:
└──stage3
   ├── main
   │   ├── BUILD
   │   ├── hello-world.cc
   │   ├── hello-greet.cc
   │   └── hello-greet.h
   ├── lib
   │   ├── BUILD
   │   ├── hello-time.cc
   │   └── hello-time.h
   └── WORKSPACE
Notice that we now have two sub-directories, and each contains a BUILD file.
Therefore, to Bazel, the workspace now contains two packages, lib and main.
Take a look at the lib/BUILD file:
cc_library(
    name = "hello-time",
    srcs = ["hello-time.cc"],
    hdrs = ["hello-time.h"],
    visibility = ["//main:__pkg__"],
)
And at the main/BUILD file:
cc_library(
    name = "hello-greet",
    srcs = ["hello-greet.cc"],
    hdrs = ["hello-greet.h"],
)

cc_binary(
    name = "hello-world",
    srcs = ["hello-world.cc"],
    deps = [
        ":hello-greet",
        "//lib:hello-time",
    ],
)
As you can see, the hello-world target in the main package depends on the
hello-time target in the lib package (hence the target label
//lib:hello-time) - Bazel knows this through the deps attribute. Take a look
at the dependency graph:
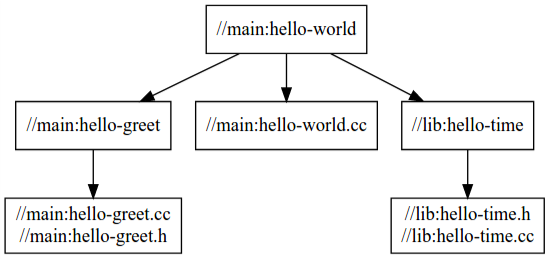
Notice that for the build to succeed, we make the //lib:hello-time target in
lib/BUILD explicitly visible to targets in main/BUILD using the visibility
attribute. This is because by default targets are only visible to other targets
in the same BUILD file. (Bazel uses target visibility to prevent issues such
as libraries containing implementation details leaking into public APIs.)
Let’s build this final version of our project. Change into the
cpp-tutorial/stage3 directory and run the following command:
bazel build //main:hello-world
Bazel produces output similar to the following:
INFO: Found 1 target...
Target //main:hello-world up-to-date:
  bazel-bin/main/hello-world
INFO: Elapsed time: 0.167s, Critical Path: 0.00s
Now test the freshly built binary:
bazel-bin/main/hello-world
You’ve now built the project as two packages with three targets and understand the dependencies between them.
Use labels to reference targets
In BUILD files and at the command line, Bazel uses labels to reference
targets - for example, //main:hello-world or //lib:hello-time. Their syntax
is:
//path/to/package:target-name
If the target is a rule target, then path/to/package is the path to the
directory containing the BUILD file, and target-name is what you named the
target in the BUILD file (the name attribute). If the target is a file
target, then path/to/package is the path to the root of the package, and
target-name is the name of the target file, including its full path.
When referencing targets at the repository root, the package path is empty,
just use //:target-name. When referencing targets within the same BUILD
file, you can even skip the // workspace root identifier and just use
:target-name.
Further reading
Congratulations! You now know the basics of building a C++ project with Bazel. Next, read up on the most common C++ build use cases. Then, check out the following:
-
External Dependencies to learn more about working with local and remote repositories.
-
The other rules to learn more about Bazel.
-
The Java build tutorial to get started with building Java applications with Bazel.
-
The Android application tutorial to get started with building mobile applications for Android with Bazel.
-
The iOS application tutorial to get started with building mobile applications for iOS with Bazel.
Happy building!